VIS 160 Senior Project - Virga

Our Progress


00
Brainstorming
We began our ideation process back in early October 2023 (now currently January 2024), mostly by targeting themes and concepts we'd like our final piece to explore.
During this time, we didn't focus on having a tangible project, and just jotted down ideas.
Week 1
Brainstorming Pt. 2
Now that we had a more concrete idea of what themes we'd like to target, we began to think of the project itself. We knew we wanted an interactive installation with sound elements, but the rest was still unknown. The sketches to the right reflect our process over time of developing a video projection-based project that users would interact with in some way.

Week 2
Brainstorming Pt. 3
By Week 1, we had settled upon the idea of a two-video projection system with buttons in front of each screen. We also knew that we wanted to explore the human experience, with choice and sacrifice as core components of the project. Our plan was to use Arduino, p5.js, video footage + sound, and visual effects to complete the project.
Themes and Concepts
-
Choice, sacrifice
-
Anger/calm dichotomy
-
Life/death
-
Desperation
-
Time
-
Unstoppable events
-
Humans as the problem and solution
-
Cooperation
Practical/Questions
By Week 1, we had settled upon the idea of a two-video projection system with buttons in front of each screen. We also knew that we wanted to explore the human experience, with choice and sacrifice as core components of the project. Our plan was to use Arduino, p5.js, video footage + sound, and visual effects to complete the project.
Our goal for this week was to continue to narrow down our project goals and create an exact task list for the project, along with a prioritization key.
Week 3
Project Proposal Week
In class, we presented our initial project proposal.
By now, we had decided on a button system that paused one video while playing the other video - the twist being that two terrible scenarios were being presented and that the viewer may only intervene for one. The problem at this point was that we didn't know the content of the videos - what would each of the scenarios be?
Feedback from Class 1/18
At this point, we presumed the best method for the piece (as we wanted different effects when interacting with the button, as well as start/stop effects for the videos) would be realtime software, namely Unreal Engine 5.
The feedback we received was to research ways that the project could be done outside of real-time while still having the desired effects. Other feedback was positive, but questioning as to what the "terrible events" would be.
Weeks 4-5
Scenario Brainstorming
Our goal for the next few weeks was to brainstorm videos that would move visitors to interact with them. We wanted to convey the following, while keeping our original target emotions in mind:
-
Human-centered "tragedies" (oil spill, arson, etc.)
-
A sense of urgency (visitor needs to interact ASAP)
By the beginning of Week 5, we had narrowed down the scenarios to the following:
Video Screen 1
-
Foot crushing unbloomed flower
-
Arson (person lighting forest on fire)
-
Shooting in gallery
Video Screen 2
-
Foot crushing bloomed flower
-
Stalking (victim is followed & ambushed)
-
Shooting in gallery
EXPERIENCE SUMMARY:
Each of the "sets" of videos would be played at the same time, creating a dilemma for the viewer. When the viewer presses one of the buttons, the associated video screen would pause while the other would continue. The second button cannot be pressed while the first is held down. If the viewer lets go of the button, then both videos play.
Each video would be 20-30 seconds, creating an agonizing time period for the viewer while they contemplate their choice. If the button is still held down at the end of the other video, then the next "set" of videos would play. This would continue until the end of the third set, where both videos play a nearly identical scenario (perhaps different camera angles as a difference) to highlight that neither choice is an ideal outcome.
Ultimately, the only way to metaphorically "win" or "survive" this experience is to walk away - without interaction, the videos would play a neutral, peaceful video of the flowers swaying in the breeze. If neither button is pressed at the end of a set of videos (or after a certain amount of time has pressed - TBD), then the videos would also reset to the peaceful flower scene.
Week 6
Changing our Idea + Midterm Presentation
Despite having a fully developed idea that we had grown fond of, we felt that there were several lacking elements, such as seeing ourselves in the piece. We had been focusing on meeting our impression of what an "ICAM senior project" should involve (technology, interaction, etc.) and trying to evoke certain audience emotions, and ultimately sacrificing having our own style and presence in the work. The previous idea, while we still believe was an interesting pursuit, was quite far removed from previous work that we had done. Therefore, we wanted to pivot our project in a direction that felt more true to us, both in terms of our previous projects and having our voices in the work.
Above: Updated presentation with new idea
Right: Early sketch and notes of the new installation


Week 7
Reimagining Video + Continued Testing
This week, we prioritized solidifying video plans. As we had recently changed our project entirely, we needed a way to incorporate similar themes into our new idea.
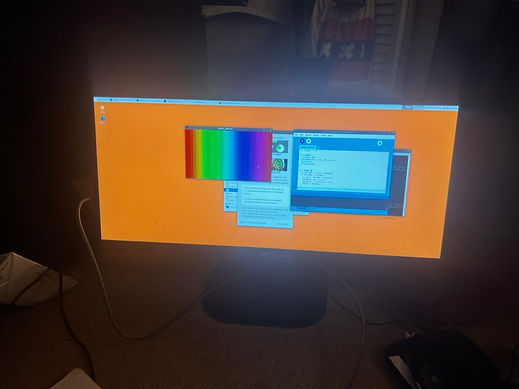
In addition, we began working with an Orange Pi to test Processing and other software. We needed to update the Pi, and work within the Terminal to do so. The following are a few images that illustrate this process.

Much of the work going into the setup of the orange pi was helpfully done during VIS 141A with Brett Stalbaum.
This background knowledge includes:
-
Basic Linux commands
-
Distributed Memory parallel computing - multiple Pi projects
-
Update the Pi
-
Work with sudo privileges
-
Network config
-
MPI for Python
As such, the installation of Processing only took around an hour after all troubleshooting and necessary updates.

Week 8
3D printing and Ordering Parts
Our goal for this week was to 3D print all necessary parts, and order all items we could foresee at the time.


We ordered:
-
Plaster casting set
-
Mold release
-
Electrical tape
-
Silicone mold making set
Following Will Cogley's Autodesk Instructables heart tutorial, we printed all parts with varying settings. Some of the smaller pieces needed to be reprinted a few times, as the quality was not high enough the first print.
-
Silicone filler set
-
Silicone Pigment
-
16-Channel 12-bit servo driver
-
M1 - M2 screws
Week 9
Assembly,Camera Testing, Location Scouting
This week, we began assembly of the heart - including soldering a few parts together for extra strength. We also begun adding the servo motors, stripping a few wires, and re-solding the ends. Huge thanks to Colin at the Envision Makerspace for providing many electronic components and support throughout the process!


In addition, we did a camera test with the Sony FS700. We tested various recording settings, including 4K slow-motion, and thought we would proceed with the camera. We then took a trip to our proposed filming location, the Salton sea, and filmed the looping flower scene.
It was not until we were back home that we realized it had not been in focus, and that the camera could not shoot 4K regularly outside of slow-motion. As such, we decided to switch to a smaller camera that was both simpler and could definitely shoot 4K. We decided that we would return at the end of Week 10 to the Salton Sea for the rest of filming, and use the Canon EOS R7. As we were both more familiar with Canon cameras, we felt this was a good change to make.
Week 10
Filming
This week, our main objective was to film our performance. We first scouted the location the week before, driving to Anza Borrego - close to the Salton Sea - to find a location. We tested our camera and noted lighting conditions and sunset times.
The Shoot: 3/15


On the drive, we passed through a rain and hail storm, even considering postponing the shoot. However, we decided the weather would complement the piece, and we were rewarded with gorgeous scenery! The shoot took around three hours, and we followed a loose outline surrounding the following topics:
Week 11, Spring Break
Planning Next Steps
During finals and spring break, we planned our next steps for Spring Quarter, and presented our updates to the class.
We also began organizing all the video files, and started the editing process.
Week 1 Spring Quarter
Planning & Next Steps
At this point, we began divvying up the physical and digital work: Bella focused on the digital, working in Nuke to. Meanwhile, Kathryn focused on physical elements, sculpting a clay version of the heart and working on the heart electronic components.

Week 2 Spring Quarter
Sculpture Work
This week, our main objective was to work on the physical elements of our project - the hands (which will hold the button), the face (which will house the speaker), and the heart.

About the Images:
Top Left: We did a paster cast of Kathryn's hands held together, to create a platform for the button to rest upon. Although pretty detailed, we had to go back in and refine some of the areas later on, where the rubber casting material had stuck.


Top Right: After a few days of allowing the air-dry clay heart to dry, we noticed small cracks across the body of the heart. We filled these cracks with plaster, and sanded it down for a smooth finish.
Bottom Left/Right: Taking inspiration from the Doctor Who Angels, we exaggerated certain facial features to create a more 'horror-inspired' face. We also decided where we would crop the scan, working in ZBrush and Blender to prepare the model for 3D printing.
Weeks 3-4 Spring Quarter
Electronics + VFX


For these weeks, we continued making progress on the electronic components and the VFX. During this point, we had to order many electronic components online (Servo Driver, DC sockets) and troubleshoot problems with insufficient voltage and code.
At this point, we also had a rough draft of the Arduino and Processing code, making sure our process would work for the final installation. Although we didn't use the final button - and kept to a breadboard - we wanted to get an idea of what the final version would look like from a technological perspective.
Weeks 5-6 Spring Quarter
3D Printing, Electronics, VFX
This week, we 3D printed the face, continued the heart assembly, and made progress on the VFX.

At this point, we had the motors working! In addition, the second 3D print of the face was successful. We had to use the larger 3D printer, as the print was slightly too large for the Prusa Mini.
Weeks 7-8 Spring Quarter
Sculpture + VFX
Our main objectives were to continue with the face sculpture, continue the VFX for the film, and most notably, start the heart jacket cast.
We applied a layer of plaster to the 3D print and sanded it. We then layered a few coats of black spray paint and glaze, before adding the final two layers of chrome spray paint (to be done next week!).


For the heart cast, we first painted a layer of silicone on the outside of the clay sculpt - this ensured all the small details were captured. Afterwards, we filled up the box with silicone, suspending the clay sculpt by attaching it to a wood 2x4. We let the cast solidify over the weekend.
Week 9 Spring Quarter
Working on... Everything!

This week, we started our 'crunch time.'
At this point, we started working on the audio for the video. The audio was composed of three main parts, divided into:
-
The beginning loop (~1 minute)
-
The video at normal speed (~25 minutes)
-
The video slowed to .25 speed (~100 minutes)
Meanwhile, the VFX work progressed nicely. In addition, we took the heart out of the initial silicone mold and cast the second part of the mold. For the second part, we poured silicone into the 'negative' mold of the heart, and placed a 3D part the same size of the electronic components inside the mold; this would effectively create the 'jacket' to the heart.

Week 10 Spring Quarter
Working on... Everything! (Continued)

As the electronic heart and button were functional at this point, we decided to start adjusting each to be installation-ready. For this, we had to extend the wiring to account for the installation space; we soldered additional wiring and used heat shrink to ensure for no electrical shorts.
At this point, everything was working from a technology standpoint - we ensured that the button would equally impact both Arduinos and their corresponding components (heart and video/speaker).
In addition, we switched the Raspberry Pi for a mini PC (provided by Brett Stalbaum; thank you Brett!!) After switching, we noticed that the video playback was improved, although we had to make a few adjustments to fit the playback size.
Finally - after allowing the silicone to set for several more days, we were able to take the jacket out of the mold. We discovered that the jacket ended up a little smaller than it should have, leaving the sides slightly exposed. Luckily, we plan on placing the heart on the ground, and as such, won't be viewed from the sides or back. Overall, it was still a great learning experience!
